Thursday, December 12, 2013

Ramp Design

       Here's the design of the ramp in two different styles: 3D printed style and 2D laser cut style. The two dimensional laser cut piece needed to be designed due to time issues with the 3D printer. The downfalls of the 2D part are there are less features, more parts and a permanent thickness to the pieces. Both pieces are under the 4 cubic inch requirement (around 1.8 to 2.5 inches squared respectively). 


 3D Ramp style (1 piece)


2D style piece (3 pieces)

Final Build Product

Here's some images showing the final build. The 3D printed ramp of the lift is still missing because time ran out but a piece of cardboard holds it's place. We're running two Arduino boards one is just supplying 5 volts to both servos and the other one has all the code and buttons on it


 Side View


Top View
 

 Top View


 Side view with cardboard ramp

Finalized code

Here's the finalized code that contains an LCD screen, 2 potentiometers, and a button.


// Code create by mark aruda for Mecanical Design Lab 1 at Umass Lowell
// Code moves 2 servos, the first moves based on the potentiometer value,
//the second servo moves between horizontal and vertical based on a pushbutton
//button attatched to 1
//potentiometer attatched to A3
//Servo 1 attatched to 9
//Servo 2 attatched to 10
//LCD attatched to 12, 11, 5, 4, 3, 2 http://www.arduino.cc/en/Tutorial/LiquidCrystal
//LCD RS pin to digital pin 12
//LCD Enable pin to digital pin 11
//LCD D4 pin to digital pin 5
//LCD D5 pin to digital pin 4
//LCD D6 pin to digital pin 3
//LCD D7 pin to digital pin 2
#include <Servo.h> //includes servo library
#include <LiquidCrystal.h>// include LCD display
Servo servo1; //servo control object
Servo servo2;
LiquidCrystal lcd(12,11,5,4,3,2);//sets up the LCD display array to those pins
const int buttonPin = 7; //labels button pin
const int potpin = A3; //labels analog read pin for potentiometer
int potposition; //creates value for potientiometer value
int servo1position; //creates variable for servo position
int servo1clockwiseSpeed = 100; //the speed to make the continuous servo go up
int servo1counterclockwiseSpeed = 80; //the speed to make the continuous servo go down
int servo1stop=90; //the adjusted servo position to make the servo stop
boolean currentState = LOW; //used for debounce code
boolean lastState = LOW;
boolean stateChange = false;
int currentButton = 0;// used for button count
int lastButton = 1;
// setup
void setup() {
lcd.begin(16,2); //to set the LCD to start with 16 coloums and 2 rows
servo1.attach(9); //servo1 attached pin 9
servo2.attach(10); //servo2 attached pin 10
pinMode(buttonPin, INPUT); //makes the button pin an input
lcd.clear();
}
// main loop
void loop(){
potposition= analogRead(potpin); //reads the potentiometer value and gives a value between 0-1023
servo1position= map(potposition,0,1023,0,180); //maps the value from the potentiometer so it can work for a servo range
//if the potentiometer is between 80 or 100 the servo will not move and it will print stopped on the LCD
if ( servo1position >= 80 && servo1position <=100)
{
servo1.write(servo1stop);
lcd.setCursor(0,0);
lcd.print("Stopped ");
}
//if the potentiometer is greater than 100 it will move in the positive direction and write that on the screen
if (servo1position > 100)
{
servo1.write(servo1clockwiseSpeed);
lcd.setCursor(0,0);
lcd.print("Going up ");
}
//if the potentiometer is less than 100 it will go down and write that on the LCD screen
if (servo1position <80){
servo1.write(servo1counterclockwiseSpeed);
lcd.setCursor(0,0);
lcd.print("Going down");
}
//look at various function descriptions
currentState = debounceButton();
stateChange = checkForChange(currentState, lastState);
currentButton = getButtonNumber(lastButton, currentState, stateChange);
indicatorLight(currentButton);
lastState = currentState;
lastButton = currentButton;
}
// function debounceButton to make sure the button is only pushed once
boolean debounceButton()
{
boolean firstCheck = LOW;
boolean secondCheck = LOW;
boolean current = LOW;
firstCheck = digitalRead(buttonPin);
delay(50);
if (firstCheck == secondCheck){
current = firstCheck;
}
return current;
}
// function checkForChange this function makes sure there is a change in whether the button is pushed or not
boolean checkForChange(boolean current, boolean last)
{
boolean change;
if (current != last){
change = true;
}
else {
change = false;
}
return change;
}
// function getButtonNumber means that if there is a change then the button count goes up by 1 untill it reaches 1
// then it goes back to 0
int getButtonNumber(int button, boolean state, boolean change)
{
if (change == true && state == LOW){
button++;
if (button > 1){
button = 0;
}
}
return button;
}
// function indicatorLight this function will set the servo to 90 degrees or 0 degrees according to what button it is on
void indicatorLight(int button) //function that acts according to the button number that the get button number function gives out
{
if (button==0) //if the button is 0 it makes the servo go to 90 degrees
{
servo2.write(20);
lcd.setCursor(0,1);
lcd.print("Lever up ");
}
if (button ==1) // if the button number is 1 it makes the servo go to 180 degrees
{ // if the button number is 1 it makes the servo go to 180 degrees
servo2.write(90);
lcd.setCursor(0,1);
lcd.print("Lever Down");
}
}
view raw gistfile1.txt hosted with ❤ by GitHub
The LCD screen is having some problems but it should be fine by tomorrows presentation.

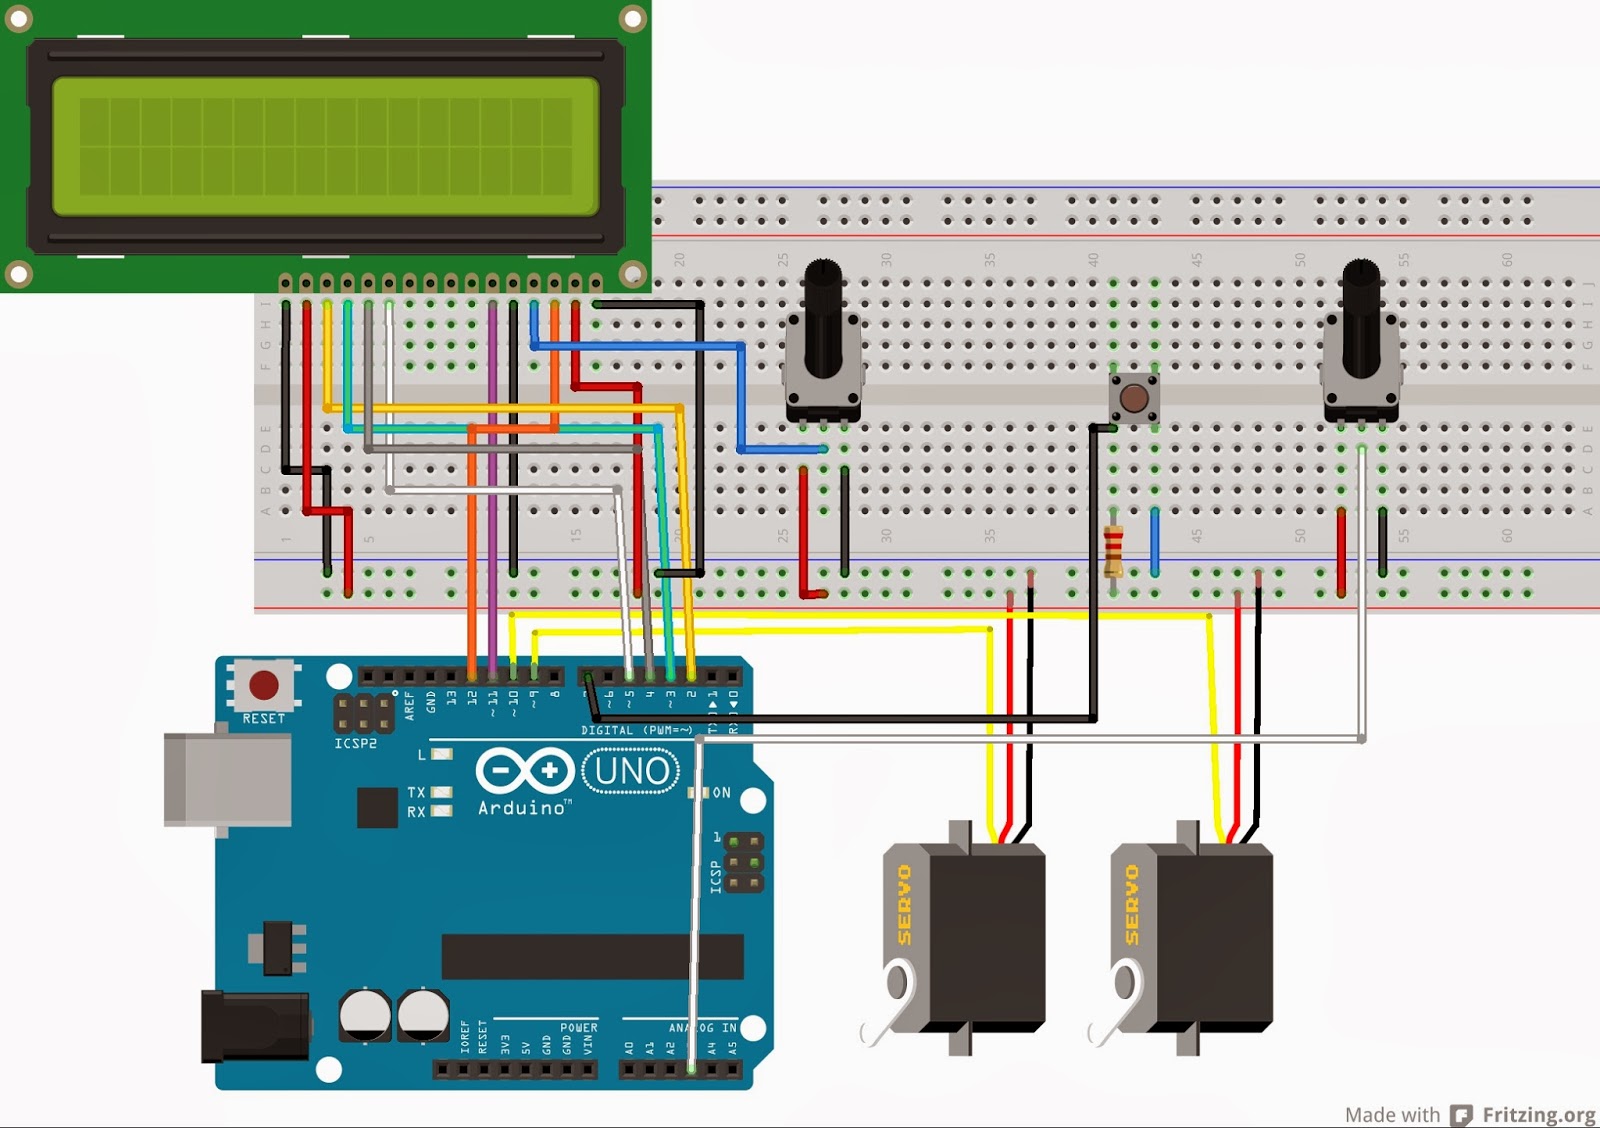
Here's the wire diagram setup.

This was created using the Fritzing program.